Hi! It's me, your flaky system test again
To my grandfather, who was always curious about how things work
There are many articles on how to write reliable capybara tests. There are less articles on how to deal with your flaky tests. There are none I’ve found on how to properly debug and really fight flaky tests back, this one is about it. I want you to get comfortable with the tools I use and get along with me while we debug one of the failing specs so thus I provide a single runnable file but for your rails application the setup is obvious: System of a test: Proper browser testing in Ruby on Rails
What we have?
require "bundler/inline"

gemfile do
  source "https://rubygems.org"

  gem "puma"
  gem "rspec"
  gem "capybara"
  gem "cuprite"
  gem "ferrum"
end

require "rspec/autorun"
require "capybara/rspec"
require "capybara/cuprite"

Capybara.app = proc { [200, {}, File.open("index.html", "r")] }
Capybara.default_driver = :cuprite
Capybara.register_driver :cuprite do |app|
  Capybara::Cuprite::Driver.new(app)
end

describe "flaky spec", type: :feature do
  let(:email) { "email@example.com" }
  let(:first_name) { "Firstname" }
  let(:last_name) { "Lastname" }

  it "submits form successfully" do
    visit "/"

    fill_in "email", with: email
    click_button("Next")

    fill_in "first-name", with: first_name
    fill_in "last-name", with: last_name
    click_button("Finish")

    expect(page).to have_text("Successfully sent")
  end
end
and our simplified html markup:
<!doctype html>
<html>
  <head>
    <style>
      body form * { display: block; margin: 10px 0; }
      #hint, .step { display: none; }
      .active { display: block; }
    </style>
  </head>
  <body>
    <form>
      <div class="step active">
        <input id="email" />
        <div id="hint">Please add here your email</div>
        <button class="btn">Next</button>
      </div>
      <div class="step">
        <input id="first-name" type="text">
        <input id="last-name" type="text">
        <button class="btn">Finish</button>
      </div>
      <div class="step">
        <p>Successfully sent</p>
      </div>
    </form>
    <script type="text/javascript">
      setTimeout(() => {
        document.getElementById("hint").style.display = "block";
      }, 55)

      document.addEventListener("click", (event) => {
        event.preventDefault();

        parent = event.target.parentElement;
        parent.classList.remove("active");
        parent.nextElementSibling.classList.add("active");
      });
    </script>
  </body>
</html>
Save it as flaky_spec.rb and index.html respectively. Run with ruby flaky_spec.rb. In our test we have a multi-step
form, where you fill in an email, click “Next” and then finish the form with first and last name. A bit of vanilla JS is
to hide second step fields and activate when we need them. We also show some kind of a hint under the first input with a
bit of delay. The test works just fine, why wouldn’t it? We use waiting matchers, no AJAX, no styles, single page and
just a handful of JS and yet very very rare it fails:
Failures:

  1) flaky spec submits form successfully
     Failure/Error: fill_in "first-name", with: first_name

     Capybara::ElementNotFound:
       Unable to find visible field "first-name" that is not disabled
     # flaky_spec:34:in `block (2 levels) in <main>'
The error shows that after we fill an email and click “Next” capybara cannot find any visible input for first-name.
So obviously the issue happens after we click on the “Next” button. You might guess that fill_in cannot find input
because it doesn’t have waiting capabilities but it does. Why in the hell test fails? After a couple of hours playing
around with such kind of a test developers usually give up and start using rspec-retry, but we are going to hunt it
down.
What do we do?
Headful mode + slowmo option
To start debugging system tests means that we need to see what’s going on in the browser. First of all we can run test in a headful mode and see it with our own eyes:
Capybara.default_driver = :cuprite
Capybara.register_driver :cuprite do |app|
  Capybara::Cuprite::Driver.new(app, {
    headless:  ENV["HEADLESS"] != "false",
    slowmo: (ENV.fetch("SLOWMO", 0.2) if ENV["HEADLESS"] == "false")
  })
end
Run with HEADLESS=false ruby flaky_spec.rb and see it passing. We also add :slowmo option with delay set to 0.2
without it everything happens way fast and we can barely see what’s going on. Experiment with :slowmo option making
the test not too slow and not too fast. Unfortunately this doesn’t help us to spot an issue, because test is always
passing but it’s a good technique for starters.
Inspector
Another useful trick we can try is to put page.driver.debug statement to the test to make it pause and open the
browser for us to debug, first let’s add inspector option to the driver:
Capybara.default_driver = :cuprite
Capybara.register_driver :cuprite do |app|
  Capybara::Cuprite::Driver.new(app, {
    inspector: ENV["INSPECTOR"] == "true"
  })
end
then:
fill_in "email", with: email
click_button("Next")

page.driver.debug
and run it with INSPECTOR=true ruby flaky_spec.rb. We will see in the console that test is paused:
Cuprite execution paused. Press enter (or run 'kill -CONT 1098635') to continue.
Opening in existing browser session.
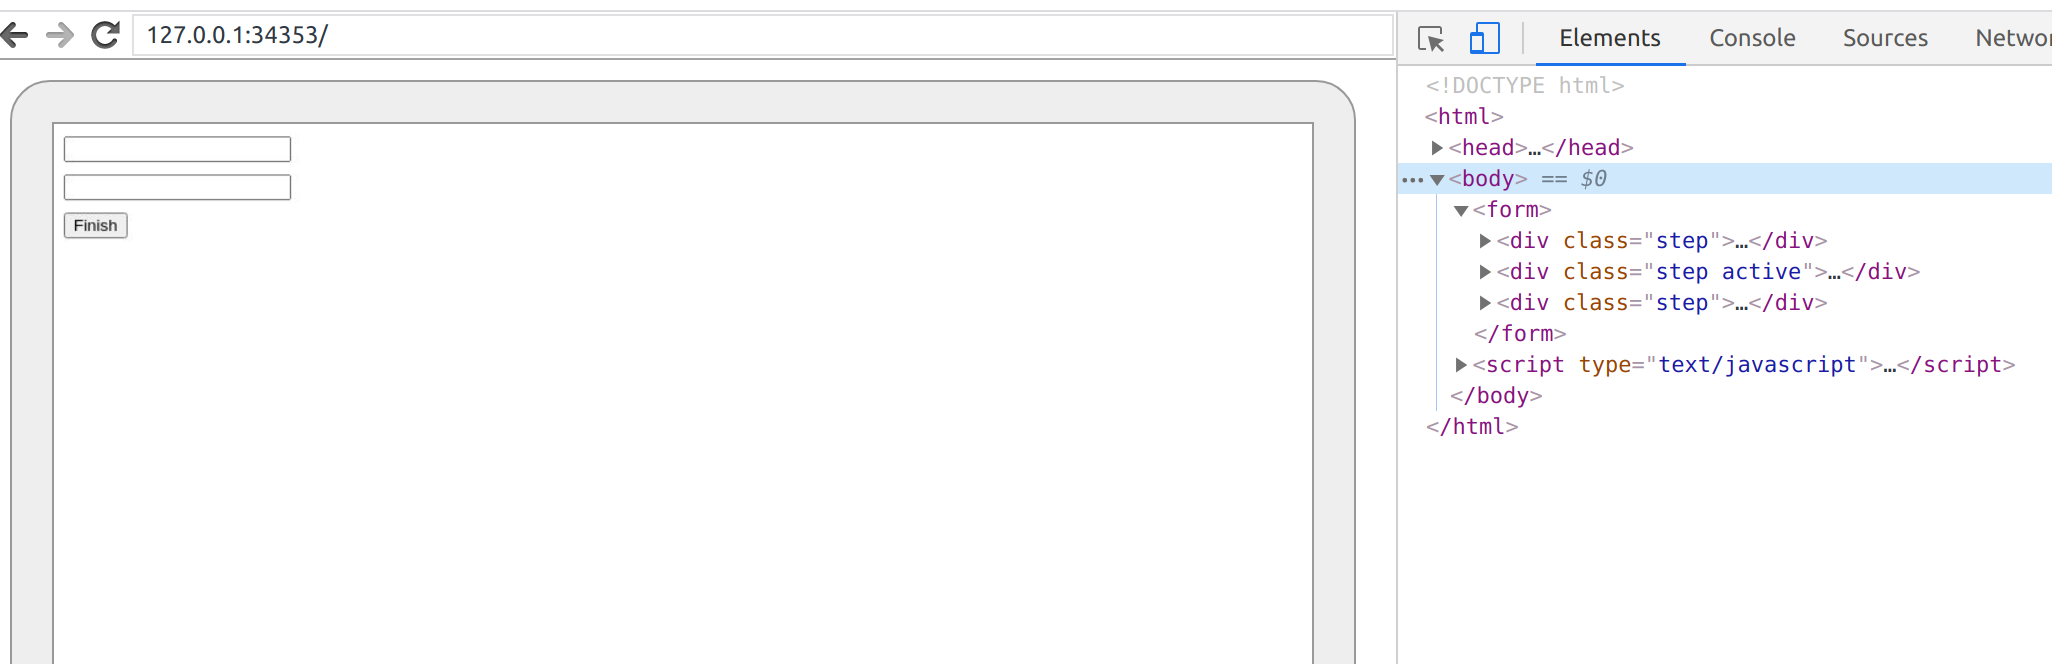
and Chrome window is ready and showing us inspectable pages:
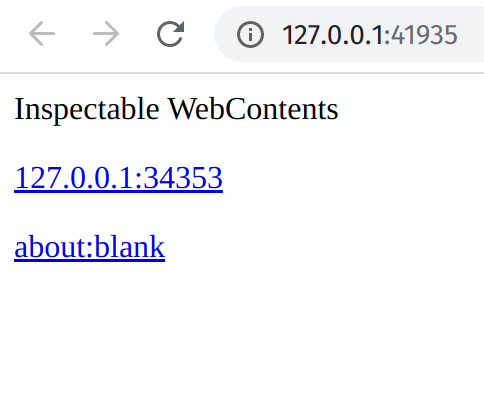
You can also call page.driver.debug(binding) and besides opening the browser Cuprite starts pry or irb console where
you can execute some statements in the test’s context. If you are lucky enough, this debugging technique can show you
that capybara cannot find first-name input because page is still showing the first step and for some reason hasn’t
switch to the second. We came a little closer to the clue, but it’s not enough.
Logger option
Using logger we can see all the messages our Ruby process exchanges with Chrome. Cuprite uses CDP protocol to control
Chrome. When your test starts running Cuprite spawns Chrome which listens to the messages through a websocket. Turning
logger on just shows in the console all the messages both processes exchange. Run CUPRITE_DEBUG=true ruby flaky_spec.rb
and you’ll see a lot of output in your console. Now it’s time to makes some sense out of it. The command we send to
Chrome starts with ▶ and shows the direction of the message:
▶ 0.32 {"method":"Page.navigate","params":{"url":"http://127.0.0.1:46551/listings"},"id":1014}
the answer we get back:
◀ 1.30 {"id":1014,"result":{"frameId":"3EBE...","loaderId":"A97..."}}
Digits you see after the direction sign is elapsed time and the message is just a simple JSON. Note matching ids, you
provide a unique numeric id with the message and Chrome has the same id for the response. You pass the command you’d like
Chrome to invoke in method with params in params. The whole list of commands for CDP protocol is here.
Let’s work on the terminology. First of all I would be ashamed to steal pictures and actually I’m ashamed, but this one
is exactly how it is in Puppeteer except that I replaced this wording with Cuprite.
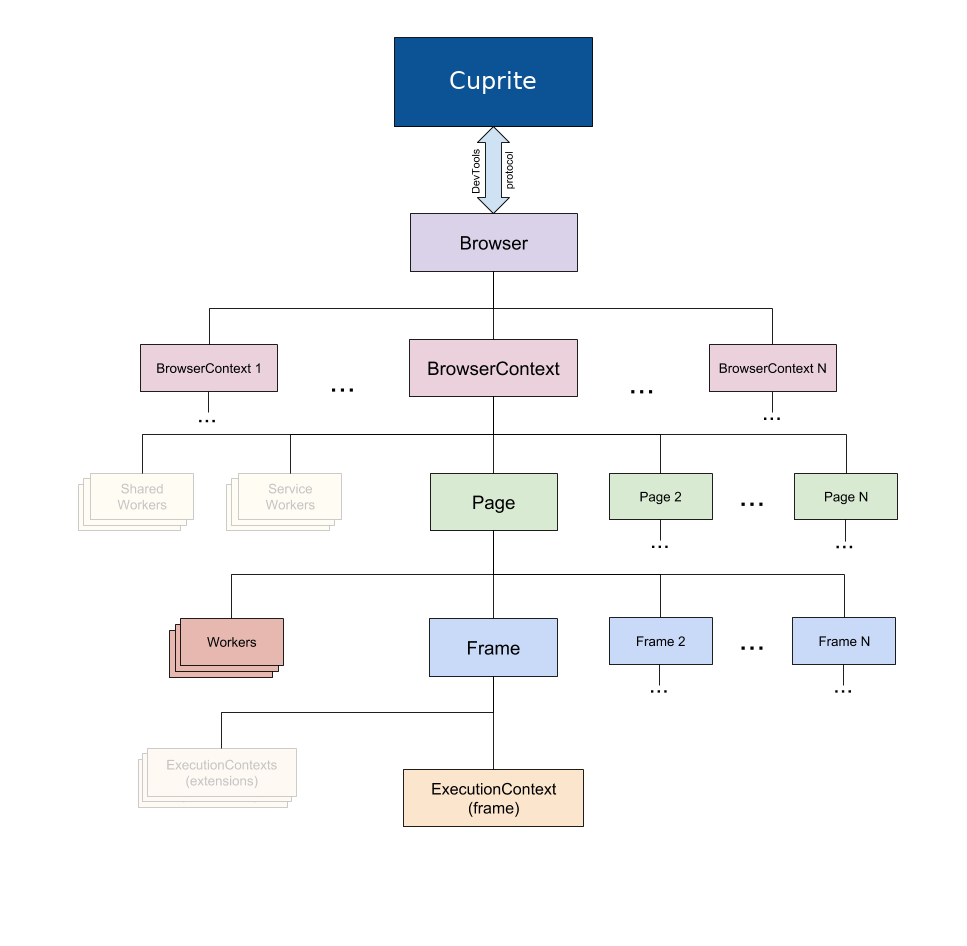
If you want to create a new page and make it go to example.com you first have to create new browser context:
{"method":"Target.createBrowserContext","params":{},"id":2}

{"id":2,"result":{"browserContextId":"9A688D2E33EB21D8FE5144A1481C2BF8"}}
Context has an id and resembles an incognito session, you can create many pages in the same context and than just dispose it with all the pages at once in the end. Create a page in the context:
{"method":"Target.createTarget","params":{"browserContextId":"9A688D2E33EB21D8FE5144A1481C2BF8","url":"about:blank"},"id":3}

{"id":3,"result":{"targetId":"F135A71EEF7D8A39547AB4C5BB3C9942"}}
Yes page is called a target in CDP terminology. Note that we pass browserContextId and a url. Chrome sends us back
targetId. Now page is created and it’s time to subscribe to interesting events we’d like to be notified of. It can be DOM or CSS,
there are many of them. I think I should mention Runtime as it’s important:
{"method":"Runtime.enable","params":{},"id":1002}

{"method":"Runtime.executionContextCreated","params":{"context":{"id":1,"origin":"://","name":"","auxData":{"isDefault":true,"type":"default","frameId":"F135A71EEF7D8A39547AB4C5BB3C9942"}}}}

{"id":1002,"result":{}}
It’s another context, but this time it’s related to JS world, this is the context where all the JS is executed for this page. Each page has a main frame and each frame has it’s own execution context. Now we can tell the page to navigate to the given url:
{"method":"Page.navigate","params":{"url":"http://127.0.0.1:36555/"},"id":1014}
As we are executing test the url obviously shows us loopback interface where capybara is running our application with puma. After this call there are some network events and messages regarding page state, and we move to the point where capybara starts filling the email and in order to do that it has to find such node first:
{"method":"Runtime.callFunctionOn","params":{"executionContextId":2,"functionDeclaration":"function() { return _cuprite.find(arguments[0], arguments[1]) }","arguments":[{"value":"xpath"},{"value":"./descendant::*[self::input | self::textarea][not(((((((./@type = 'submit') or (./@type = 'image')) or (./@type = 'radio')) or (./@type = 'checkbox')) or (./@type = 'hidden')) or (./@type = 'file')))][((((./@id = 'email') or (./@name = 'email')) or (./@placeholder = 'email')) or (./@id = //label[(normalize-space(string(.)) = 'email')]/@for))] | .//label[(normalize-space(string(.)) = 'email')]//./descendant::*[self::input | self::textarea][not(((((((./@type = 'submit') or (./@type = 'image')) or (./@type = 'radio')) or (./@type = 'checkbox')) or (./@type = 'hidden')) or (./@type = 'file')))]"}]},"id":1014}
Finding a node means executing a JS function in the execution context for the main frame, capybara passes a long
argument - xpath for email input. In return we get Runtime.RemoteObjectId which can be converted to the nodeId which
can be used to work with such node, in our case we want to set input’s value:
{"method":"Runtime.callFunctionOn","params":{"executionContextId":2,"functionDeclaration":"function() { return _cuprite.set(arguments[0], arguments[1]) }","arguments":[{"objectId":"-8351792869791064162.2.7"},{"value":"email@example.com"}]},"id":1026}
After that we have to find “Next” button and click it in order to activate next step, so capybara once again finds node by xpath and this time we need to get coordinates of such node because we have to send click there, so we get content quads, calculate the coordinates and fire the click:
{"method":"DOM.getContentQuads","params":{"nodeId":16},"id":1038}
{"id":1038,"result":{"quads":[[8,41,51.40625,41,51.40625,62,8,62]]}}

{"method":"Input.dispatchMouseEvent","params":{"type":"mouseMoved","x":29,"y":51},"id":1044}

{"method":"Input.dispatchMouseEvent","params":{"x":29.703125,"y":51,"type":"mousePressed","button":"left","clickCount":1,"modifiers":0},"id":1045}

{"method":"Input.dispatchMouseEvent","params":{"x":29.703125,"y":51,"type":"mouseReleased","button":"left","clickCount":1,"modifiers":0},"id":1046}
Notice that we first have to scroll this element into the view, then move mouse and only then click. After that we start
to look for the next xpath for first-name. Depending on if test passed or not you will either see capybara found input
or tries to find it until give up. So what does it give us? We can clearly see that click happened and if you are an
eagle eye you may have noticed:
{"method":"DOM.attributeModified","params":{"nodeId":14,"name":"class","value":"hint"}}
right between mouse pressed and released. So when we fire the click JS kicks in and our hint appears with display: block
which moves our button down. It’s invented example, but instead of such JS it can be AJAX, styles invalidation, image
loading or many other things that are happeneing when page is still loading. Do you think about such things while writing
the test? Can you remember a real case when you misclicked on the link because some content appeared? It happens for me
quite often. So why your test can’t?
How to fix it?
The answer depends on your application usually. If it’s AJAX you have to replace content properly, if it’s styles try to make height static if you can or it will make your end users nervous as well. Always think about asynchronous nature of the webpage while writing your system tests.
If you cannot solve issue directly, try to replace
clickwithtrigger(:click). There is huge difference between them as for the latter we don’t need coordinates, but there’s also downside as your element can be not clickable at all, obscured by the others and you won’t catch it in the tests.Cuprite also comes with lot’s of configurable settings. It actually has node movement protection, but it’s set to a very bare minimum because we don’t want to slow down your tests:
FERRUM_NODE_MOVING_WAIT=0.01andFERRUM_NODE_MOVING_ATTEMPTS=50. We try to get coordinates of your node a few times with little delay and if it’s moving we do max number of attempts until give up and raiseNodeIsMovingError. You can increase this env variable and check if it makes your build more stable.
Bonus
BROWSER_PATH=/path/to/chrome # Path to Chrome binary
CUPRITE_DEBUG=true # Turn on debug mode and show logs in the console same as FERRUM_DEBUG=true
FERRUM_DEFAULT_TIMEOUT = 5 # How long wait for an answer from Chrome
FERRUM_PROCESS_TIMEOUT = 10 # How long wait for Chrome process to start
FERRUM_NODE_MOVING_WAIT = 0.01 # For how long wait before trying to get coordinates again
FERRUM_NODE_MOVING_ATTEMPTS = 50 # How many attempts to do until give up since node is moving
FERRUM_CLICK_WAIT = 0.1 # How long wait for frame to start loading after click
CUPRITE_TRIGGER_CLICK_WAIT=0.1 # How long wait for frame to start loading after trigger
CUPRITE_MODAL_WAIT=0.05  # How long wait for modal dialog
FERRUM_NEW_WINDOW_WAIT=0.3 # How long wait for a new window